Flutterでは自分で画像を用意して表示することができますが、自分で図形を描いて自由に動かすこともできます。
本記事では、CustomPainterを使用して星を描きつつ、描いた星を回転させる方法を備忘として残しておきます。
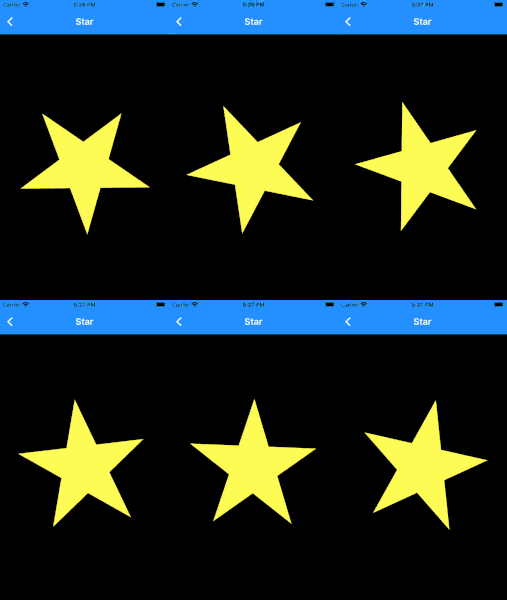
実際に回転させるとこんな感じになります。
また、記事後半にはCustomPainterを勉強するのにオススメのUdemy講座も載せています。是非、最後まで読んでいってください。
CustomPainterで図形を描くのは結構面白いのでオススメです。
Flutterで星(図形)を描く
Flutterで図形を描く際に以下のクラスを準備する必要があります。
- CustomPaintクラス
- CustomPainterを継承したクラス
以下で順番に見ていきます。
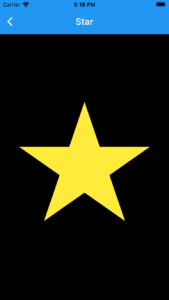
実際に作成した画面はこちらです。
CustomPaintクラス
CustomPaintクラスはSingleChildRenderObjectWidgetを継承したWidgetです。
図形を表示したい箇所で、このクラスを宣言していきます。
具体的には以下のようになります。
  Widget build(BuildContext context) {
    return Scaffold(
      appBar: AppBar(
        title: Text('Star'),
      ),
      backgroundColor: Colors.black,
      body: Center(
        child: CustomPaint(
          size: Size(double.infinity, double.infinity),
          painter: StarPainter(val: -animation.value),
        ),
      ),
    );
CustomPaintクラスではpainterという引数に、CustomPainterを継承したクラスを設定していきます。
CustomPainterを継承したクラス
CusomPainterクラスを継承したクラスを実装します。
その際に「paint」と「shouldRepaint」という2つのメソッドをOverrideして、実装する必要があります。
具体的なコードは以下のようになります。
class StarPainter extends CustomPainter {

  @override
  void paint(Canvas canvas, Size size) {
    double centerWidth = size.width / 2;
    double centerHeight = size.height / 2;

    final _starOffsetList = <Offset>[
      Offset(centerWidth + 90, centerHeight + 120),
      Offset(centerWidth - 145, centerHeight - 45),
      Offset(centerWidth + 145, centerHeight - 45),
      Offset(centerWidth - 90, centerHeight + 120),
      Offset(centerWidth + 0, centerHeight - 145),
    ];

    final path = Path()..addPolygon(_starOffsetList, false);
    canvas.drawPath(
      path,
      Paint()
        ..color = Colors.yellow
        ..strokeWidth = 1.0,
    );
  }

  @override
  bool shouldRepaint(covariant CustomPainter oldDelegate) {
    return true;
  }
}paintメソッドでは、図形を描くための処理を書いていきます。
引数のcanvasには円や四角や線を描く処理(drawXXX)が用意されているので、基本的な図形はそれを使えば簡単に書くことができます。
今回はdrawPathという処理を使用して星を描きました。
shouldRepaintメソッドでは、Widgetが再構築されたときに図形を再描画するかどうかを設定します。
trueにすると図形を再描画します。今回は星を回転させるため、trueにしておきます。
falseにすると再描画しません。再描画する必要がなければfalseにしておいたほうが良いでしょう。
描いた星を回転させる
次に描いた星を回転させます。
回転させる方法はFlutter標準搭載のAnimationを使用していきます。
コードは以下のようになります。
class StarScreen extends StatefulWidget {
  @override
  _StarScreenState createState() => _StarScreenState();
}

class _StarScreenState extends State<StarScreen> with SingleTickerProviderStateMixin {

  late Animation<double> animation;
  late AnimationController controller;

  @override
  void initState() {
    super.initState();
    controller =
        AnimationController(vsync: this, duration: Duration(seconds: 4));

    Tween<double> _rotationTween = Tween(begin: -pi, end: pi);

    animation = _rotationTween.animate(controller)
      ..addListener(() {
        setState(() {});
      })
      ..addStatusListener((status) {
        if (status == AnimationStatus.completed) {
          controller.repeat();
        } else if (status == AnimationStatus.dismissed) {
          controller.forward();
        }
      });
    controller.forward();
  }

  @override
  void dispose() {
    controller.dispose();
    super.dispose();
  }

  @override
  Widget build(BuildContext context) {
    return Scaffold(
      appBar: AppBar(
        title: Text('Star'),
      ),
      backgroundColor: Colors.black,
      body: AnimatedBuilder(
        animation: animation,
        builder: (BuildContext context, Widget? child) {
          return CustomPaint(
            size: Size(double.infinity, double.infinity),
            painter: StarPainter(val: -animation.value),
          );
        },
      ),
    );
  }
}
AnimatedBuilderでCustomPaintを返すようにします。その際に、Animationの値を渡していますが、この値はラジアンです。
AnimationControllerのDurationを4秒に設定しているので、4秒間で1週まわるようなラジアンをCustomPaintに渡すことができます。
このラジアンを使用して、星の位置を変えることで回転を実現することができます。
星の位置を変えるコードは以下のとおりです。
class StarPainter extends CustomPainter {
  final double val;

  StarPainter({required this.val});

  @override
  void paint(Canvas canvas, Size size) {
    double centerWidth = size.width / 2;
    double centerHeight = size.height / 2;

    final _starOffsetList = <Offset>[
      Offset(centerWidth + 90, centerHeight + 120),
      Offset(centerWidth - 145, centerHeight - 45),
      Offset(centerWidth + 145, centerHeight - 45),
      Offset(centerWidth - 90, centerHeight + 120),
      Offset(centerWidth + 0, centerHeight - 145),
    ];

    final _rotateOffsetList =
        _starOffsetList.map((o) => _rotate(o, val, centerWidth, centerHeight)).toList();

    final path = Path()..addPolygon(_rotateOffsetList, false);
    canvas.drawPath(
      path,
      Paint()
        ..color = Colors.yellow
        ..strokeWidth = 1.0,
    );
  }

  @override
  bool shouldRepaint(covariant CustomPainter oldDelegate) {
    return true;
  }

  /// 回転の公式を利用し、指定したラジアンで回転させた場合のOffsetを返す
  /// Q((−)cos−(−)sin+, (−)sin+(−)cos+)
  Offset _rotate(Offset old, double radians, double centerWidth, double centerHeight) {
    final dx = (old.dx * cos(radians) - centerWidth * cos(radians)) -
        (old.dy * sin(radians) - centerHeight * sin(radians)) +
        centerWidth;
    final dy = (old.dx * sin(radians) - centerWidth * sin(radians)) +
        (old.dy * cos(radians) - centerHeight * cos(radians)) +
        centerHeight;
    return Offset(dx, dy);
  }
}
ポイントは_starOffsetListに含まれるすべてのOffsetに対して、渡されたラジアンを使用して回転の公式を用い、新しいOffsetを設定している点です。
まとめ
CustomPainterを使用して、自分で図形を描くことは難しそうな気がしていましたが、簡単な図形(円とか四角)であれば処理が用意されているので、数行で描くことができます。
Animationなどと組み合わせると、リッチなWidgetが作成できるため、うまく使っていくことで、イケてるアプリを作成できそうです。
CustomPainterについてしっかり学ぶには、動画学習サイトのUdemyで公開されている、CustomPainterでグラフを作成する講座がオススメです。
※割と初心者向けなのでFlutterに慣れている人にはオススメできません。
「【Flutter】グラフ作成を通して図形描画に不可欠なCustomPainterを学習する![]() 」
」
Flutter学習情報
Flutterを勉強するのに最適な参考書は、以下の「基礎から学ぶFlutter」です。
環境構築から、Dart/Flutterの基本/テストやパフォーマンスチューニングまで一通り学ぶことができます。
また、当ブログではFlutterを初心者が学ぶためにオススメな方法を「Flutter を初心者が学ぶおすすめの勉強法!【間違いない動画があります】」という記事で公開していますので、Flutterに興味がある方は是非読んでみてください。

動画学習がしたい!という方にオススメの記事がこちらです。

Flutterの将来性はどうなのか?をまとめた記事はこちらです。
